DIY - Experiments with light
If we watch television, turn on the radio, write a message with our smartphone, or heat up food in the microwave, we are using electromagnetic energy. Today, all people are constantly dependent on this energy. Without it, life as we know it in modern cities would be completely different.
Aim of this lesson
In this lesson we are using a light sensor to detect the illuminance of visible light in lux.
Materials
- Light Sensor
TSL 45315
Basics
Electromagnetic energy moves in waves through space. These waves range from very long radio waves to very short gamma rays. The human eye can only perceive a very small part of this spectrum; visible light. Our sun is the source of energy over the entire spectrum. The Earth's atmosphere protects us from exposure to high levels of radiation that could be dangerous for us.
In this lesson, the intensity of visible light is of main interest. To measure the intensity of the incident light in the visible part of the spectrum, the unit lux is used. It indicates the ratio of the brightness in lumens per square meter. On a bright sunny day, the light is measured at about 100,000 lux, and for a full moon at night the illuminance is measured at only about 1 lux.
For this measurement we use the I²C sensor TSL45315 of AMS-TAOS. In the sensor datasheet you can see that its sensitivity is matched to the visible part of the light spectrum, which is approximately between 400 and 700 nm.
According to the data sheet, the sensitivity of this sensor reaches from 2 to 200000 Lux, with a resolution of 3 lux. Furthermore, the sensor needs a power supply of 3.3V.
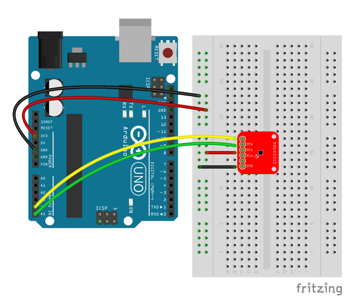
Construction

Program
We will use the library Wire for communication via I²C. In the beginning we need a few constants that are defined with the directive #define. Unlike variables, they occupy a permanent place in memory. In our case, the bus address and the following register addresses of the sensor are to be saved.

These registers are used for the sensors configuration and its I²C address:
#include <Wire.h>
#define I2C_ADDR    (0x29)
#define REG_CONTROL  0x00
#define REG_CONFIG   0x01
#define REG_DATALOW  0x04
#define REG_DATAHIGH 0x05
#define REG_ID       0x0A
In the setup() function we will connect to the sensor and send the configuration bytes to it:
Wire.begin();
Wire.beginTransmission(I2C_ADDR);
Wire.write(0x80 | REG_CONTROL);
Wire.write(0x03); // Power on
Wire.endTransmission();
Next, we will set a fixed exposure time of 400 ms:
Wire.beginTransmission(I2C_ADDR);
Wire.write(0x80 | REG_CONFIG);
Wire.write(0x00); // 400 ms
Wire.endTransmission();
To change the shutter speed, you can change the corresponding value of 0x00 in 0x01 or 0x02 to reduce the exposure time to 200 or 100 ms in the configuration register of the sensor.
In the loop() function, we start the measurement routine and request the raw bytes containing the measurement from the sensor:
Wire.beginTransmission(I2C_ADDR);
Wire.write(0x80 | REG_DATALOW);
Wire.endTransmission();
Wire.requestFrom(I2C_ADDR, 2); // Request 2 bytes
uint16_t low = Wire.read();
uint16_t high = Wire.read();
If the sensor sends more data than requested, these bytes should be caught afterwards to avoid errors in the next loop.
while (Wire.available()) {
  Wire.read();
}
Finally, we transform the data to calculate illuminance in lux. In the sensor's datasheet, we can find the matching formula:
uint32_t lux;
lux = (high << 8) | (low << 0);
lux *= 1; // Multiplier for 400ms
To adjust this formula to an exposure time of 200 or 100 ms, you can increase the multiplier to 2 or 4.
Exercise 1
Adapt this lesson's code to create a custom function that can print the sensor data to the Serial Monitor.
Exercise 2
Change the exposure time of the sensor and then compare the results of the measurements.
Tip: Don't forget to adjust both the lux value and exposure time in the configuration register accordingly.
