The first sound - using a buzzer
Until now, our senseBox has been silent. In this project, we will change this!
Aim of the Project
For the first step, we simply want to get a sound from the buzzer. Next we want to change the volume of the buzzer. Finally, the buzzer should play a simple melody. While the first two steps can be quickly achieved, the third step is a little trickier.
Materials
- buzzer
- Potentiometer
Basics
A buzzer, or a Piezo, is a component that converts electrical signals into sound. The volume can reach up to 80dB. The buzzer has two pins where it can attach to the plug-in board. The operating voltage of the buzzer is between 1V and 12V, and it consumes up to 19mA. Similar to the LED, the buzzer’s electricity is only able to flow in one direction. The shorter pin must be connected to the grounding (GND) source and the longer pin must be connected to the voltage source.
The Potentiometer is an electrical component whose resistance value can be continuously adjusted. Its settings can be adjusted by moving a grinder over the resistor body. Usually a potentiometer has three pins: two for the resistance and a third for the tap. Our potentiometer has a maximum resistance of 10k ohms.
Warning: Small potentiometers are designed only for a small current flow. For the electrical components in senseBox, this potentiometer is sufficient. If you connect components with greater power consumption (for example, a servo motor) however, you need a larger potentiometer.
Construction
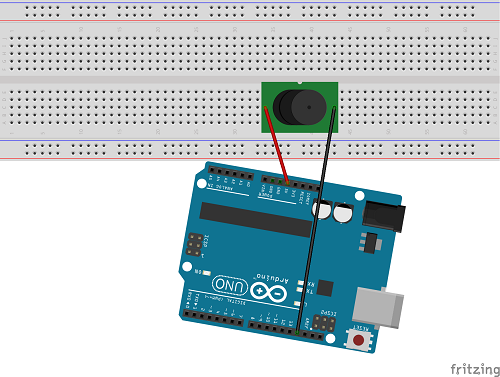
Step 1:
If you build the circuit as shown in the graph and connect the Arduino to the power supply, the buzzer should produce a loud sound. By doing this we have already completed our first step.
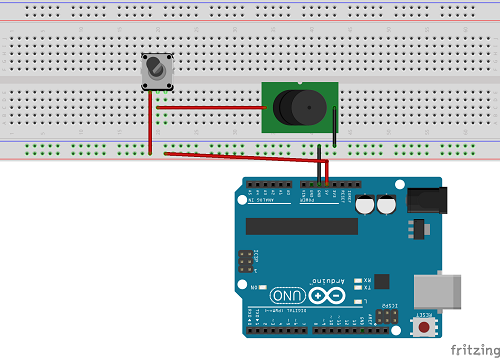
Step 2:
Now we’d like to integrate another component into our circuit that will enable us to change the volume. We will use a potentiometer to control the buzzer’s volume, similar to the volume control knob that is seen on older radios.
Next, connect the 5V output of the Arduino and the long pin of the buzzer to the potentiometer. Now you are ready to change the volume using the potentiometer!
Step 3:
A single continuous sound is not really exciting - our buzzer is capable of more! To produce different tones, we can use special outputs from the Arduino that are able to output pulse-width modulation. For more information on pulse-width modulation (PWM), look here.
These pins are marked with the sign ~: The included pins are 4, 5, 6, 9, 10 and 11. A buzzer produces a specific sound for each pulse width.
Every tone on the scale (scale: c, d, e, f, g, a, h, c) receives a pulse width. We will use the construct #define as follows:
#define  h     4064    // 246 Hz
#define  c     3830    // 261 Hz
#define  d     3400    // 294 Hz
#define  e     3038    // 329 Hz
#define  f     2864    // 349 Hz
#define  g     2550    // 392 Hz
#define  a     2272    // 440 Hz
#define  h     2028    // 493 Hz
#define  C     1912    // 523 Hz
#define  E     1518    // 659 Hz
#define  F     1432    // 698 Hz
#define  R     0       // define a note as substitute for a pause
Now we need some variables to control the playback behavior of the Arduino. Later you can try different values and check how this affects the melody:
// Set overall tempo
long tempo = 26000;
// Set length of pause between notes
int pause = 1000;
// Loop variable to increase Rest length
int rest_count = 50;
Now we need some global variables that are used by the playback functions, and we will define the setup:
// Initialize core variable
int tone = 0;
int beat = 0;
long duration = 0;
int speakerOut = 9;

void setup() {
  pinMode(speakerOut, OUTPUT);
}
Now we can write our melody using an array. Another array beats is defined, representing how long the corresponding note should be played in melody:
int melody[] = { g, e, R, R, R, e, f, g, E,  E,  C }; //example melody
int beats[]  = { 8, 8, 8, 8, 8, 8, 8, 8, 16, 16, 32 };
Later you can insert your own melody here.
We will next write a help method, which plays one tone of our melody. For this purpose, it will check the first if statement and evaluate whether it is a tone or a pause. If it is a tone, the tone will be played in a loop for a certain duration measured in milliseconds:
void playTone() {
  long elapsed_time = 0;
  if (tone > 0) { // if this isn't a Rest beat
    while (elapsed_time < duration) {

      digitalWrite(speakerOut,HIGH);
      delayMicroseconds(tone / 2);

      // DOWN
      digitalWrite(speakerOut, LOW);
      delayMicroseconds(tone / 2);

      // Keep track of how long we pulsed
      elapsed_time += (tone);
    }
  }
  else { // Rest beat;
    for (int j = 0; j < rest_count; j++) {
      delayMicroseconds(duration/2);
    }
  }
}
After our sound has been played, it’s time to play an entire melody with another helper method. We will now implement a method for playing the whole melody.
For this is a for loop is written to go through the melody array, and to retrieve the helper function playTone() for each entry, which we have defined above. In addition to each tone, a short pause, or delay, is inserted.
int MAX_COUNT = sizeof(melody) / 2; // number of tones

void playMelody(){

  for (int i=0; i<MAX_COUNT; i++) {
    tone = melody[i];
    beat = beats[i];

    duration = beat * tempo; // Set up timing

    playTone();

    delayMicroseconds(pause);
  }
}
Now we must include the main loop, which controls the flow of the program:
void loop() {
  playMelody();
}
Idea: If you would like to include higher or lower notes in your tune, you can define them similar to what we have done in the example above. [here] (http://www.phy.mtu.edu/~suits/notefreqs.html) you can check how much Hertz a tone has.
Warning: All variables defined in the program must have a unique name!
Made with ♥ by the senseBox team at ifgi, WWU Münster
All content is published under CC BY-SA 4.0
